New avatar modification and mocap features in RUIS 1.20

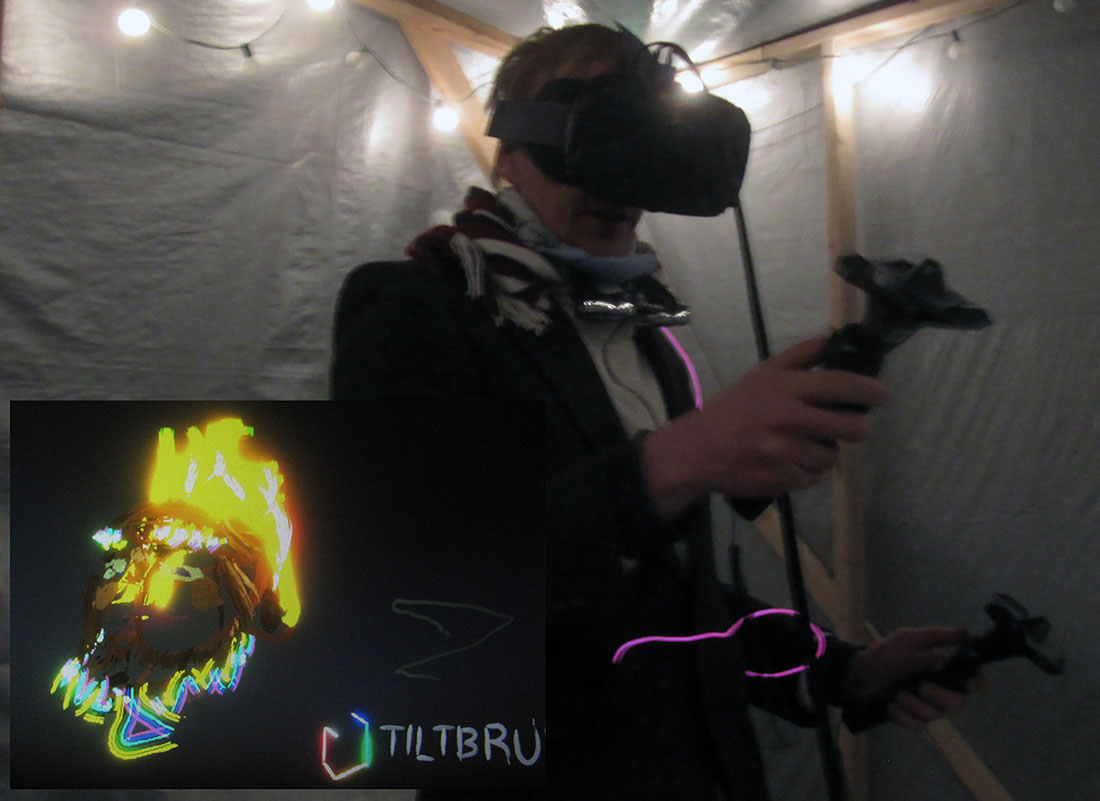
Version 1.20 1.21 of RUIS for Unity is now available for download. The below video demonstrates some of the new features that have been added since the last release; most of the new features relate to avatar body modification and support for different motion capture systems.

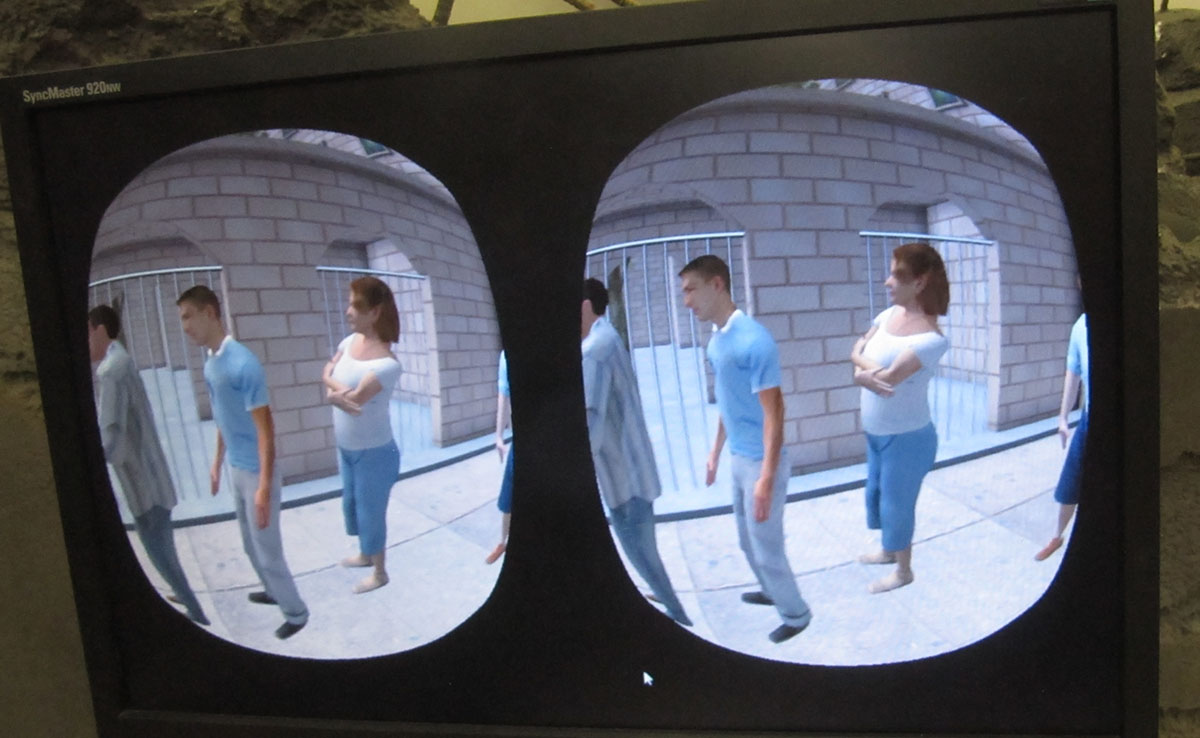
The RUIS toolkit is useful when developing applications for VR studies or VR experiences that employ avatars: as in the previous RUIS version, any rigged humanoid 3D models that can be imported to Unity will work as motion captured full-body avatars. They can also be easily embodied from a first person perspective when using a VR headset.

The new version has a variety of avatar modification parameters (body segment thickness, translation & rotation offset, etc.) that can be used to customize the avatars. The parameters can be scripted and adjusted in real-time to create body morphing effects.

In contrast to the previous RUIS versions which worked mainly with Kinect v1 and v2, the new version makes it easy to utilize any motion capture systems, whether optical- (e.g. OptiTrack, Vicon) or IMU-based (e.g. Perception Neuro, Xsens). These full-body motion capture systems can be paired to work with any VR headsets that are supported by Unity, so that the headset pose is tracked with its tracking system; this is in contrast to existing solutions offered by e.g. OptiTrack and Vicon, which required you to use their motion capture system to track everything, including the VR headset. That results in added latency and inability to utilize time/space-warp features of Oculus or HTC Vive.

As it is, this newest RUIS version is a bit rough around the edges and still contains a lot of legacy stuff that manifests itself as ~100 deprecation related warnings upon compilation. I hope to release a new version during summer, which fixes or mitigates remaining issues.

The documentation contains further information on this new release. Below you can find excerpts of the documentation, shedding light on the new features.

Controlling an avatar with a mocap system

This section describes how to use an arbitrary full-body motion capture system to control your avatars. You may skip the whole section if you are using Kinect v1 or v2. Read this section carefully if you are using Perception Neuron, Xsens, OptiTrack, Vicon etc.

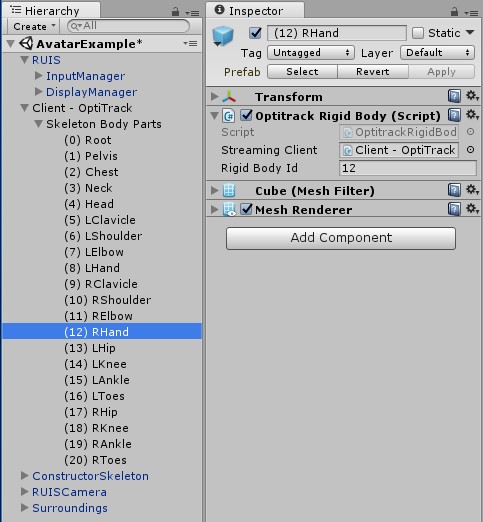
Below cropped screenshot of Unity Editor presents an example of using OptiTrack motion capture system to animate avatars in real-time with RUIS. First, you need to import the Unity plugin of your mocap system into your project. Then create GameObjects for each mocap tracked body joint, whose Transforms will be updated with the world position and rotation of the tracked joints.

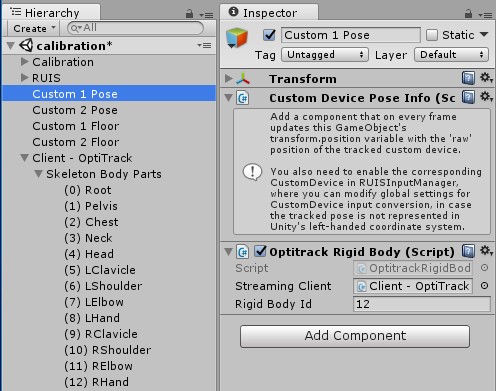
In this example the joint pose updating is achieved via the OptitrackRigidBody script, that comes with the MotiveToUnity plugin. In the case of OptiTrack, stream the skeleton as individual rigid body joints instead of streaming the skeleton data format, because the joint position data is not used in the OptiTrack plugin’s own example scene where the whole skeleton object is streamed. When using OptiTrack you should also write a script that finds out the streamed rigid body joint ID numbers and assigns them to all the OptitrackRigidBody components upon playing the scene. Please note that there is no “AvatarExample” scene (as seen on the screenshot) within the RUIS project. You could use e.g. the MinimalScene example as a starting point for your avatar experiments in RUIS.

Optitrack example

Your avatar GameObject has to have the RUISSkeletonController script. At first use the ConstructorSkeleton prefab as a ready made example, and make sure that your scene also includes the RUIS prefab that contains the InputManager and DisplayManager.

When using other motion capture systems besides Kinect, you need to make sure that the “Body Tracking Device” field is set to “Generic Motion Tracker” in RUISSkeletonController. Also disable the “Filter Rotations” option, or adjust the “Updates Per Second” property to match the mocap system update rate if you absolutely need rotation filtering. Note the two settings pointed by the magenta arrows, which should be enabled when using a IMU mocap suit (e.g. Perception Neuron, Xsens) together with a head-mounted display.

RUISSkeletonController input settings

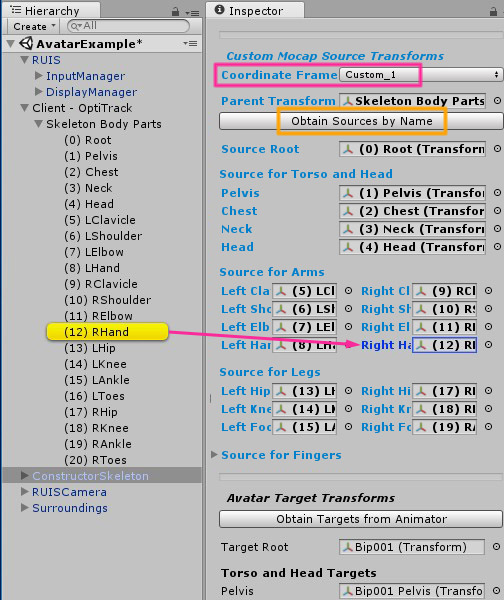
Scroll down in the RUISSkeletonController script Inspector to see the “Custom Mocap Source Transforms” -section, which is only visible if “Body Tracking Device” is set to “Generic Motion Tracker”. Give RUISSkeletonController component access to the aforementioned GameObjects (that will be updated with the world position and rotation of the mocap tracked joints) by linking their parent to the “Parent Transform” field, and clicking the “Obtain Sources by Name” button (indicated by yellow rectangle). Be sure to double-check that the results of this automatic linking process are correct. Alternatively, you can drag the individual GameObjects into the corresponding “Custom Mocap Source Transforms” fields, as exemplified by the magenta arrow in the below image. Some of the fields can be left to “None”, but we recommend that you link all available mocap tracked joints; at least Source Root, Pelvis, Shoulders, Elbows, Hands, Hips, Knees, and Feet.

The avatar should make a T-pose in Play Mode, when the mocap tracked joint GameObjects all have an identity world rotation (0, 0, 0) and their world positions correspond to that of a T-pose. Your mocap system plugin might not input joint poses in that format. In that case the joint GameObjects should have child GameObjects with a rotation offset that fulfills the T-pose requirement, when the child GameObjects are linked to the “Custom Mocap Source Transforms” fields instead of their parents. This method can also be used to create joint position offsets.

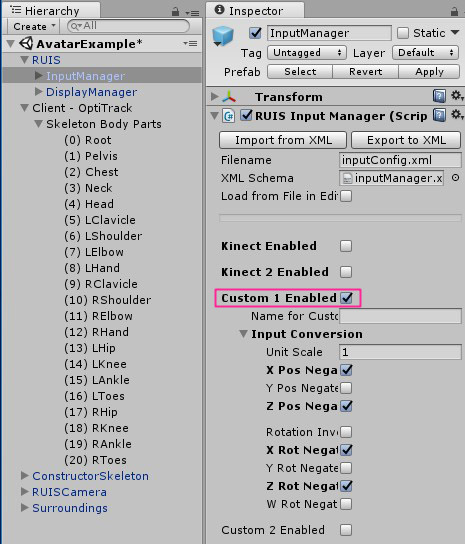
Note the “Coordinate Frame [and Conversion]” field outlined by the magenta rectangle. That setting associates a specific coordinate frame (“Custom_1”) with the avatar and its mocap system, which allows applying any coordinate alignment and conversions that are required to make the avatar function properly in Unity and together with other input devices supported by RUIS. If you are using Perception Neuron, leave this property to “None”.

RUISSkeletonController joint pose sources

To access the coordinate conversion settings, you should enable the associated “device” (Custom 1) from the RUISInputManager component, which is located at the InputManager gameobject (parented under RUIS gameobject). You only need to adjust these settings if the avatar ends up being animated wrong, for example if the joints point at different directions in Unity than in the motion capture software (e.g. Axis Neuron, if you are using Perception Neuron).

The below example shows what “Input Conversion” settings are needed to make avatars work properly with joint data that is streamed from OptiTrack’s old Motive 1.0 software from early 2013. Basically the input conversion is used to make the streamed motion capture joint position and rotation format to conform with Unity’s left-handed coordinate system. You can adjust the “Input Conversion” settings in Play Mode to see their effects in real-time.

Custom input source and its conversion

At the very bottom of RUISSkeletonController component there are the Avatar Target Transforms fields that need to point to the joint Transforms of the avatar rig. In case you are using a mocap system with finger tracking, you should note that Finger Targets are not assigned in the RUIS avatar prefabs. With MecanimBlendedCharacter prefab you can click the “Obtain Targets from Animator” button, but with other RUIS avatar prefabs you need to drag and drop the transforms manually. This will be fixed for the next RUIS version. You also need to disable the “Fist Clench Animation” option.

Using a VR headset with a mocap system

If you want to implement first-person avatars by using a VR headset together with a separate, full-body mocap system, then it is best to utilize the VR headset’s tracking system for moving the virtual cameras. That will minimize motion-to-photon latency and allow time-warp optimizations. Consequently, you will then be operating two motion tracking systems simultaneously. If the mocap system is optical (e.g. Kinect, OptiTrack, Vicon), then in most cases you want to align the coordinate frame of the mocap system with the coordinate frame of the VR headset’s tracking system. An alternative to this alignment is to enable the “HMD Drags Body” and “IMU Yaw Correct” options in RUISSkeletonController, which only works if the mocap system accurately tracks head yaw rotation, ruling out Kinect v1 and v2. This alternative approach has a side effect of making the avatar “slide” if there is noticeable latency between the mocap and the VR headset tracking.

When using a VR headset, enable the “Update When Offscreen” option of the avatar’s SkinnedMeshRenderer component, for avoiding mesh blinking in first person view. In RUIS 1.21 this option is disabled by default in all RUIS avatar prefabs (will be fixed for next version).

Aligning coordinate frames happens via a calibration process, which is not required when using a IMU mocap suit (e.g. Perception Neuron, Xsens) together with the VR headset. The calibration occurs in calibration.scene that comes with RUIS. When using some other mocap system than Kinect v1 or v2, then you need to edit the scene so that the “Custom 1 Pose” GameObject’s world position and rotation will have their values from a joint that will be streamed from your mocap system. If necessary, also edit the “Input Conversion” settings of the RUISInputManager component that is located at InputManager GameObject (parented under RUIS GameObject of the scene).

Custom input in the calibration.scene

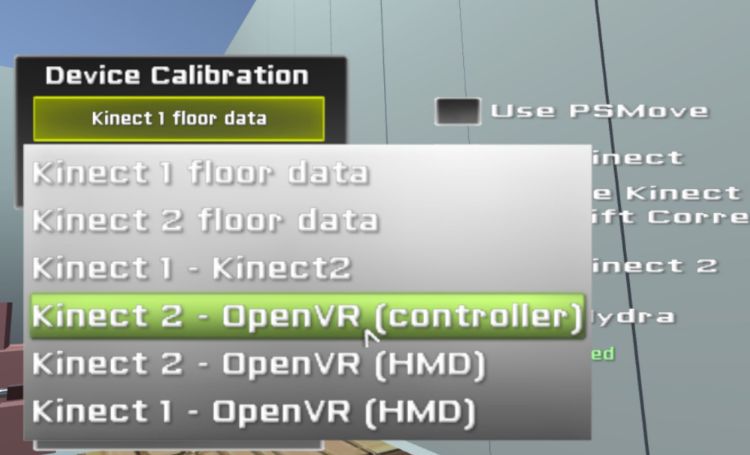
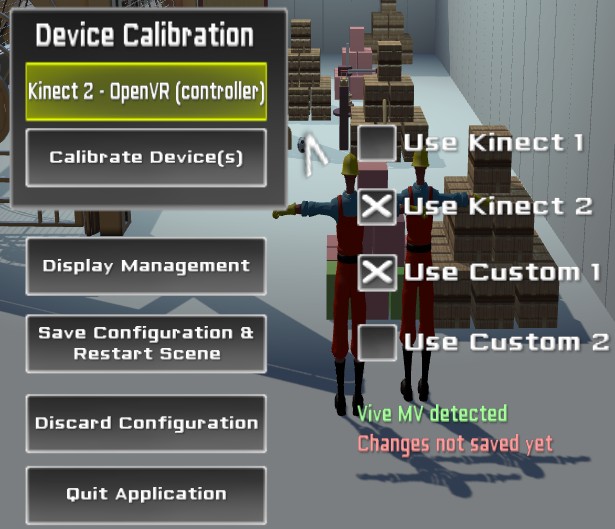
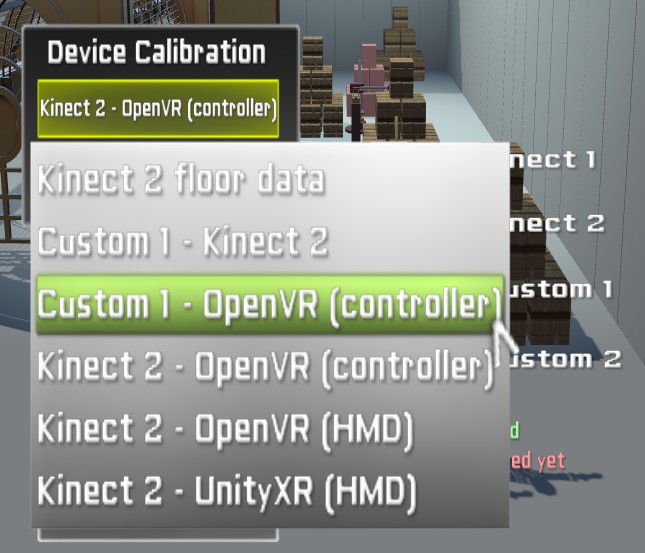
You can align the coordinate frames of two input devices by running the calibration.scene in Unity Editor; in this case just make sure that you have the intended two devices selected in the RUISCoordinateCalibration component, which is located at the Calibration GameObject of the scene. Alternatively, you can initiate the calibration process via RUIS menu, which can be accessed in Play Mode by pressing the ESC key in any of the RUIS example scenes. Use a mouse to click the green button under the “Device Calibration” label, which opens up a drop-down menu of devices that can be aligned; the available menu items depend on the enabled devices and the detected VR headset.

Starting coordinate alignment/calibration via RUISMenu

Once you have selected the device pair from the drop-down menu, click “Calibrate Device(s)” button to start the process for aligning their coordinate frames.

Starting coordinate alignment/calibration via RUISMenu

Avatar customization and automatic scaling

RUISSkeletonController allows the customization (affecting looks) of arbitrary avatars via relative offsets in translation, rotation, and scaling of individual body segments. These properties can be animated via scripting, which facilitates the creation of interactive effects, for-example power-ups that make the avatar’s arms bigger etc.

Below image shows the most important settings of the RUISSkeletonController component. If “Keep PlayMode Changes” (yellow rectangle) option is enabled, majority the properties are highlighted with a light yellow background during Play Mode: the values of these highlighted properties will retain their values when exiting Play Mode. This is useful because you need to be in Play Mode to see the effects of the scaling and offset properties, and the default Unity Editor behaviour is to reset all changes made to properties when exiting Play Mode.

The properties within the blue rectangle are the most significant avatar scaling options. By modifying them you can adjust body segment thickness and scaling granularity: “Scale Body” (scales whole avatar, required by all other scaling options), “Torso Segments” (scales individual torso segments), “Scale Limbs” (scales limb segments uniformly to affect their length), and “Length Only” (scales limbs non-uniformly to preserve their thickness). Limbs refer to forearms, upper arms, thighs, and shins. Enabling “Scale Body” and “Scale Limbs” options matches the avatar’s proportions with those of the user (lengthwise).

The magenta rectangle surrounds the most important “Scale Adjust” and (translation) “Offset” properties that affect the looks of the avatar’s torso and head.

Avatar Customization Settings

Besides affecting looks, correcting retargeting issues is the secondary function of avatar body segment settings that affect translation, rotation, and scale. Such issues arise if an avatar and the utilized mocap system use different location and orientation conventions for corresponding joints. For example, mocap systems often have a specific ratio between spine bone (pelvis, chest, neck, head) lengths, which vary little between users of different height. The corresponding ratios can be vastly different for various 3D model rigs that are used as avatars.

If “Scale Body” and “Torso Segments” options are enabled, then the avatar’s spine bones will be scaled so that their lengths correspond to the input from the mocap system. This can lead to peculiar body scaling (e.g. neck gets too thin or thick), if the spine bone ratios are different between the avatar and the input from the mocap system. This can be corrected by adjusting the “Scale Adjust” or (translation) “Offset” properties of the affected bone. In similar instances with mismatched bone ratios, the avatar’s torso can look peculiar even if “Torso Segments” is disabled, in case any of the individual body segment mocap options (e.g. “Chest Mocap”) is enabled under “Update Joint Positions”. This can also be addressed by adjusting the “Scale Adjust” or “Offset” properties. Each time you switch to a new avatar or to a different mocap system, you might need to modify the avatar’s “Scale Adjust” or “Offset” properties.

Enabling the “Length Only” option for scaling works only with certain avatar rigs, where there exists a single local axis (X, Y, or Z), which points the bone length direction consistently among all the limb joint Transforms (shoulders, elbows, hips, and knees). Set “Bone Length Axis” to that axis. You can discover the correct axis by selecting individual limb joint Transforms of the rig while having the “Pivot” option of “Transform Gizmo” and “Move Tool” chosen in Unity Toolbar. This makes the “Move Tool” to indicate localScale axes of the selected joint Transform. The correct axis is the one that is aligned with the bone length direction. In some avatar rigs that alignment is not consistent among all the limb joints (e.g. many Mixamo rigs), in which case you should disable “Length Only”. In the next RUIS version you will be able to set “Bone Length Axis” separately for arms and legs, covering Mixamo rigs and others with inconsistent bone length axis directions.

The default “Max Scale Rate” of 0.5 (units per second) is too high for Kinect and other mocap systems that continuously estimate user’s bone lengths. This default was chosen because “Max Scale Rate” also limits how quickly any changes to “Thickness” and “Scale Adjust” properties are manifested in the avatar, and smaller values would have made the changes less apparent. In a future version these properties will not be limited by “Max Scale Rate”, and the default will be set to 0.01.

Finally, remember that tooltips provide additional information about the properties of RUISSkeletonController. Tooltips appear when hovering the mouse cursor over the property name in Inspector. Tooltips do not show up during Play Mode.

Posted in RUIS | Tagged , , , , , , , , , , , , , , | Leave a comment

VR interfaces versus traditional interfaces

VR tools for 3D asset creation and scene management purposes are emerging in greater numbers than ever before, encouraged by the growing use of VR technology. The adoption rate of these VR tools is an indirect indicator of VR interfaces’ benefits, which are not clear when compared to traditional interfaces.

The potential of VR interfaces is nicely illustrated by Bruce Branit’s “World Builder” short film from 2009, which depicts a fictional VR tool for creating 3D worlds:

Such VR interfaces have a lot of promise for fun and intuitive creation and editing of digital assets. But can they match or surpass the productivity achieved with traditional interfaces that utilize a pointing device and a keyboard? This is a question that has been on my mind throughout my VR research career.

Unfortunately there is little research about the immersive VR interfaces’ advantages over traditional interfaces. This hasn’t stopped companies from adding VR interfaces to their existing software, or creating new VR applications for tasks that in the past have been mainly performed using more traditional input devices.

Oculus Medium is an example of the latter. Basically it is Zbrush in VR: a sculpting application for creating 3D models. Unlike Medium, conventional sculpting applications like Zbrush and Mudbox rely on traditional interfaces, and are heavily used in a professional capacity.

VR editors in game engines are another example of using VR interfaces for existing tasks. 3D asset creation and management functionality has been recently added to Unreal Engine and Unity. Below video demonstrates Unreal Engine’s VR editor:

Similar VR editor for scene management is available also for Unity. The Unreal and Unity VR editors are intended to be used via motion controllers, and both include 3D widgets and basic 3D interaction techniques such as navigation, as well as creating and manipulating objects.

For now, Unreal VR editor seems to be slightly more advanced, as it contains snapping, mesh editing tools, and the ability to paint textures on mesh objects. I have personally experimented with such features in the past, by creating an immersive 3D user interface for Blender.

So far I don’t see anything in the aforementioned VR editors, which couldn’t be done with a more traditional graphical user interface, which is also likely to be more productive. In the context of game development suites and 3D animation & modeling, I can imagine VR interfaces being faster only in tasks that do not require great accuracy: quick and dirty placement of objects, 3D sculpting, and animation blocking. More intelligent snapping tools could help this situation in the future.

In the below table I compare VR interfaces to traditional graphical user interfaces that rely on a pointing device (usually mouse) and a keyboard.

VR interfaces pointing device & keyboard interfaces
+ better spatial perception + better pointer accuracy
+ increased physical activity + less fatigue and strain
+ potentially more intuitive + more ergonomic
+ potentially more fun + more efficient/productive

VR headsets offer 3D stereo and head tracking. These features provide better spatial perception when compared to 2D displays. There is plenty of research that supports this notion. VR interfaces also have the potential to be more intuitive or even more fun than traditional interfaces, since they are better suited for mimicking real world interaction. Furthermore, VR interfaces are more suitable for exergaming purposes.

On the other hand, 2D mice have better pointer accuracy and ergonomics  than VR controllers, because the user hand rests on a table and motion is restricted to a 2D plane. Current VR controllers are often held in mid-air, which elicits fatigue and strain.

More accurate pointing allows faster object selection using a smaller motion range, which helps traditional interfaces to be more efficient. Another factor contributing to the efficiency of traditional interfaces, is the use of keyboard. A keyboard has dozens of buttons that can all be mapped to different actions. Conversely, VR controllers have only a few buttons and much fewer button press combinations.

If you have any doubts about current VR interfaces being less productive in the terms of performed tasks, then I invite you to observe a professional 3D modeler or a professional gamer using a traditional input devices:

Researchers have created and will continue to create studies that compare task performance (e.g. 3d modeling tasks) between traditional interfaces and VR interfaces. Ultimately it is the adoption rate of VR interfaces by professionals that determines their usefulness compared to traditional interfaces. Therefore we ought to observe if and at what capacity professionals use VR interfaces in applications like Unity, Unreal, and Medium.

Will professional 3D artists start to prefer something like Oculus Medium over Zbrush or Mudbox? Only time will tell. I reckon that there are certain tasks where the use of VR interfaces could become popular (EDIT: for example creating the overall base mesh with a VR tool, while doing detailed sculpting and retopo with traditional tools), whereas majority of work in Unreal, Unity, and 3D animation & modeling software will remain to be performed with traditional input devices. Mouse and keyboard are here to stay for the foreseeable future.

There are no guarantees that VR interfaces would be rapidly adopted by professionals in a domain like 3D modeling; plenty of work still remains to be done in the design, software, and hardware aspects of VR interfaces.


Regarding terminology

In this article I have used the term “traditional interfaces” as an abbreviation for graphical user interfaces that utilize a 2D monitor, pointing device, and keyboard. I avoided using the term WIMP (windows, icons, menus, pointer) interfaces, because its definition is unclear about the inclusion of keyboard shortcuts.

Similarly, I used the term “VR interface” to mean 3D user interfaces that utilize an immersive display (head-mounted display or CAVE) and 3D input devices. Since my points also apply to augmented reality – a subset of mixed reality (MR) – I could have replaced “VR interfaces” with the term “MR interfaces”, if we consider VR to be a subset of MR. The latter notion is slightly misleading, because MR was originally defined as “…anywhere between the extrema of the virtuality continuum.” In other words, VR aims to provide completely artificial reality and not a mix of real and artificial.

Recently, a new term called “extended reality” (XR) has emerged, which is intended to cover the whole reality-virtuality continuum. When it comes to including VR under the XR umbrella, it’s debatable whether extending reality with artificial is any more appropriate than mixing the two. In summary, practitioners could benefit if user interface terminology was more refined.

Posted in Virtual Reality | Tagged , , , , , , , , , , , , | 2 Comments

Perception Neuron support, forum registration fixed

Recently I created a slightly updated version of RUIS that supports Perception Neuron. It’s a Unity 5.6 project, which you can download here:
https://drive.google.com/open?id=0B0dcx4DSNNn0R012YXItTm5NVXc

EDIT:
There was a bug in one of the newly added scripts that made the head & HMD direction matching (and yaw drift correction) work only half of the time. The bug can be fixed by replacing line 124 in RUISYawDriftCorrector.cs from

driftVector = Quaternion.Euler(0, -Vector3.Angle(driftingForward, driftlessForward), 0) * Vector3.forward;
to
driftVector = Quaternion.Euler(0, ((Vector3.Cross(driftingForward, driftlessForward).y < 0)?-1:1) * Vector3.Angle(driftingForward, driftlessForward), 0) * Vector3.forward;

Please note that for now this is an unofficial release, and the Download page still links to the old RUIS 1.10 file, which doesn't have Perception Neuron support. A new, official RUIS release will come out later this year.

The project contains a new example scene (RUISViveNeuron), which allows you to use Perception Neuron with HTC Vive. It has some nice features like automatic yaw drift correction. Furthermore, you can also use Kinect and other sensors together with the Perception Neuron, as long as Vive is set as the "master coordinate system".

Check out the READMENeuronTest.txt file that comes with the project for more details.

Update regarding RUIS Forum

I also want to thank Dev for pointing out a problem with the RUIS Forum registration, which I have now fixed. Consequently, the forum registration works again!

Posted in RUIS | Tagged , , , , , | Leave a comment

RUIS 1.10 with support for Vive and Rift CV1 released

A new version of RUIS is available at our download page. It finally adds support for Oculus Rift CV1 and HTC Vive, while requiring Unity 5.4. All head-mounted displays and motion controllers (including Oculus Touch) that support OpenVR can now be used in RUIS. They can also be calibrated to operate in the same coordinate system with Kinect.

Device Pairs

Choices for calibrating device pairs

A good example of using Kinect body-tracking together with a head-mounted display in the same coordinate system is demonstrated by our Vertigo demo (which now also supports HTC Vive):


This is the first time since the Oculus Rift DK1 and its extended mode that it is again possible with RUIS for Unity to render simultaneously to a head-mounted display and other displays, including CAVE setups:

4-wall CAVE test (panorama)

4-wall CAVE test (panorama)

If you’re rendering on other displays besides head-mounted displays in RUIS, you should be aware that Unity has a bug with custom projection matrices, which messes up shadows. Unity 5.5 will apparently get rid of the bug. Until then, there is a quick fix available however.

See the latest RUIS readme for more information about this release.

The next version of RUIS for Unity will include a simple OpenVR calibration process that allows you to match the coordinate systems of an OpenVR device and a custom tracking system of your choice (e.g. OptiTrack mocap setup). My aim is to enable developers to easily use head-mounted displays with their own (possibly high-end) full-body mocap systems, thus enabling simplified development of first-person avatar experiences.


Posted in RUIS | Tagged , , , , , , , , , | Leave a comment

Considerations for VR developers

I recently gave a talk titled “Staying Ahead of the Curve in Virtual Reality” at ARTtech Seminar of Assembly computer festival (video embedded at the end of this post). In the talk I discussed some of my own work, and gave an overview on current consumer VR and its near future. In this post I want to focus on the following three considerations for VR developers that I laid out in the finale of the talk:

1. Justification for VR

Ask yourself, why does your application need to utilize VR? Are you using VR just as a gimmick? Games and other applications do not get magically better just by converting them into VR. The use of VR is a no-brainer in certain types of games and entertainment where additional immersion and depth cues are important. But that is not the case for all games (2D games being the most obvious ones), let alone business software.

Take into account that currently the added immersion of head-mounted displays come at the cost of ergonomics; the user has to wear a heavy, sweaty headset that induces vergence-accommodation conflict and suffers from a low resolution. Over time all these issues will be alleviated and even removed altogether, but people will still be using 2D displays far into the foreseeable future. The added value from the use of VR must outweigh its costs for your application.

Furthermore, VR interfaces and traditional interfaces excel at different tasks (I’ll discuss that in a future post), and it is not clear yet in which application domains the use of VR brings noticeable benefits. Entertainment and training VR applications seem like safe bets. But the net benefits are less clear for other domains. For example, in the domain of 3D content creation we can pose the following question: which of the numerous real-world 3D modeling and animation tasks faced daily by production companies become more efficient in VR? Further experimentation is needed from researchers and practitioners of VR.

2. Social VR

I encourage VR developers to give thought on how they could benefit from having people interact together within their VR application. Mere head and controller tracking adds a good amount of expressive power to non-verbal communication in VR. A glimpse of this can be seen at the end of the Oculus Toybox demo video. Humans are social by nature, and all the major consumer VR companies are looking into bringing more human expressions into VR. Thus, in the future consumer VR tracking systems will track our whole bodies, eyes, and facial expressions.

At one end of the social VR spectrum is the concept of metaverse, along with massive online virtual worlds and social networks. AltspaceVR and JanusVR are examples of early attempts at creating immersive, online virtual worlds. At the moment they are still relatively small scale and could be described as VR playgrounds for multiple users. In contrast to open virtual worlds and VR town squares, there will also be demand for more intimate telepresence applications for two people or small groups to convene. Such applications could be a part of a larger metaverse or made available as a standalone, single-purpose app like Skype.

VR game developers should consider adding social dimensions to their games, even for single-player experiences. Simplest way to do this is to implement spectator modes and live VR streaming. A company called Vreal is developing a software platform for that purpose, with the aim of becoming the Twitch of VR.

Multiplayer games that involve waiting (e.g. for the start of the next match) could include simple VR waiting rooms for social interaction. As online communities tend to be riddled with abuse, you shoul look into ways of reducing such bad behavior.

And lets not forget the possibilities that online collaboration in VR presents for business software, as demonstrated by MiddleVR‘s Improov3 demo:

3. Augmented Virtuality / Multitasking

Many current consumer VR headsets completely block the view to the real world, requiring the user’s full attention. If you’re a VR game developer, ask yourself whether your game is captivating enough to keep players away from other activities. Because when the player gets bored, the only escape is to remove the headset and quit the game.

All games become repetitive sooner or later, when the player gets used to the gameplay mechanic or is forced to do mindless grinding in order to proceed. Nevertheless, many players keep playing because they want to see what the game has to offer around the next corner. In non-VR games the players can cope with the boredom by simultaneously engaging some additional activity.

According to a study by Foehr (2006), American teenagers frequently consumed another media while playing video games; 41% of the total time spent on video games involved such multitasking. Playing video games was most commonly paired with watching TV and listening to music. Due to the reality-occluding nature of head-mounted displays, VR developers need to see extra effort to provide similar multitasking capacities that are implicitly present in non-VR games.

HTC and Valve were smart to allow some real-world multitasking by equipping the Vive headset with a camera. This augmented virtuality implementation allows the user to utilize their keyboard and grab their drink while wearing the headset.

Fortunately VR can be augmented with anything, and we are not limited only to real world elements. Envelop VR (EDIT: they folded, check out a company called V instead) and Virtual Desktop applications already demonstrate how to use 2D applications in VR. But rather than have a VR desktop application, I’m more enthusiastic about bringing arbitrary 2D content and software streams inside any VR application or game. This will allow the user to seamlessly multitask between the 2D streams and the actual VR application where they appear. I created the below concept image using a screenshot from Pool Nation VR to illustrate this idea:

Augmented Virtuality Concept

In this example the player has augmented the game with two additional 2D streams positioned in the virtual world: a Reddit browser tab and an episode of The Office (streaming from a hard-drive or online video service such as Netflix). Both streams could be viewed and interacted with while playing virtual pool.

VR developers could allow user-specified 2D streams into their application: video screens, browser tabs, and 2D applications. This is somewhat analogous to custom radio stations of GTA games, which allowed players to listen to their own music while playing. Of course it doesn’t make sense for every developer to implement their own 2D stream functionality, and a Unity/Unreal plugin with those capabilities will emerge in the near future.

To summarize this section: a VR developer should decide if their application allows “in-app multitasking” or requires full attention from users. The latter approach could be too much to ask as far as games are concerned.

UPDATE1: User ‘BOLL’ from Steam forums told me that the following software for injecting “2D streams” into VR apps are already being used and further developed:
https://github.com/Hotrian/OpenVRDesktopDisplayPortal
https://github.com/scudzey/UVROverlay

Apparently these plugins are mostly used by Elite Dangerous players to watch TV streams during long and tedious space travels.

UPDATE2: Yet another “2D injection software” is by a company called V, who have just released a private beta. Upon googling, I found out that Road To VR covered them already in May.

Videos of My Talk and Interview

Thumbnail of the video was not chosen by me, and the talk is relatively vendor neutral.

I also participated in AssemblyTV Fireside chat interview, where the interviewer asked about future ramifications of VR. This led to discussion that I considered to be thought-provoking:

Posted in Virtual Reality | Tagged , , , , , , , | 1 Comment

Pioneering consumer virtual reality

There are a number of compelling reasons about why now is a good time to start working with virtual reality (VR). Most of these points apply to augmented and mixed reality as well.

Pioneering VR

I start off by introducing my two main assertions regarding the current situation of consumer VR:

1. Anyone can become a VR pioneer. Consumer VR is being invented right now, and VR as a media is being defined. VR research has been conducted for decades and in that regard experienced VR researchers have an advantage over hobbyists. But the spread of consumer VR hardware leads to democratization of this new media; now the masses can also have access to high-performance VR equipment. This situation can be compared to the arrival of home video cameras, which gave rise to influential film makers such as Stephen Spielberg.

2. Individuals and small teams can make a big impact in VR. Many areas of consumer VR are uncharted territory, and in that sense independent developers and big companies are on the same level. Both can make major contributions in the field. You could for example get lucky and create a killer application for VR; think of Minecraft, Kerbal Space Program, and other small projects that came to be very influential. Not all discoveries and innovations need an enormous budget and a large team of engineers. A few years from now it will be more difficult to influence the field of VR as it becomes more established. *

This ongoing pioneering phase of consumer VR offers numerous opportunities for developers and creatives:

  • Finding application domains and niches where the use of VR is advantageous.
  • Building social VR platforms.
  • Producing unprecedented, culturally significant VR content.
  • Developing tools for VR content production and distribution, e.g. the photoshops and wordpresses of VR.
  • Pioneering VR content fundamentals, such as effective VR storytelling techniques.
  • Creating better 3D user interfaces for VR and helping to define related standards.
  • Engineering hardware innovations.

Some of these opportunities will have big monetary rewards, and some have important consequences for the future of human culture and the way we interact with computers.

Further considerations

The hype surrounding VR is currently helping developers, and makes it easier to pitch your ideas. But be aware of the inflated expectations that will inevitably lead to a backlash of some magnitude. Furthermore, a mass adoption of consumer VR devices takes several years. So prepare for the long haul. Unity co-founder David Helgason suggested that new VR companies should have funding for the next 2-4 years.

Most developers in the Western world will target the English speaking market. However, one should not underestimate the Chinese VR market, and the possibilities that it offers. For example, gaming cafes are very popular in China, and they are gradually equipped with VR devices.

And finally, lets not forget that VR is fun and the technology provides countless ways to express yourself, both artistically and experimentally. If you want to get involved with VR development, but don’t know where to start, these answers on Quora will point you in the right direction.


* Assertion 2. relates to user-led innovation, which is a concept where not only big producer companies are a source of product innovation, but also individual users (including small companies) and communities. In my PhD thesis I discuss VR also from a user-led innovation perspective (Section 2.3), while the main focus of the thesis is in VR application development. One example of current user-led innovation in the field of VR is the abundant experimentation with different forms of VR locomotion:

Posted in Virtual Reality | Tagged , , , , | 3 Comments

Thoughts on Microsoft Hololens

In May I had the opportunity to try out Microsoft Hololens. It had a phenomenal inside-out positional tracking, which felt very robust. As reported widely online, its field of view is very limited. That is the single biggest obstacle for usability and immersion. As a self-contained wearable display device, Hololens is a great “development kit” for augmented reality developers to start experimenting with the technology. I believe that it will be useful in a number of real-world cases, despite the narrow field of view.

I was surprised that the interactive cursor was locked to the center of the display, and could only be moved only by rotating my head. I was expecting to be able to relocate the cursor by moving my hand in front of the device, because hand gestures are also used for “clicking” and bringing up the menu. Hololens also comes with a wireless clicker peripheral that can be used instead of the gestures. That would be my preferred way for interaction due to the clicker being more robust and ergonomic. Perhaps the “locked” cursor is a good idea after all, for those same reasons.

Trying out Hololens

Coming RUIS for Unity Update

A few words about the future update of RUIS for Unity: The currently distributed version 1.082 still requires Oculus Runtime 1.06, which is obsolete and does not support Oculus Rift CV1. I have created a beta version of RUIS that supports HTC Vive, which I used for adding Vive support for the Vertigo experience. I have not made that version public, because it is still very much a hack. I’m waiting for Unity to release stable version of Unity 5.4, which eases my job by adding native support to Vive and unifies the head-mounted display interface.

I have submitted my PhD thesis (about virtual reality) for review, but I still have a bunch of other projects I’m working on. Therefore the new RUIS version will probably come out in July or August. It’s worth the wait 🙂

Posted in Augmented Reality | Tagged , , , , , , | Leave a comment

Immersive Journalism

I was going through my old photos and found something that I should have blogged years ago.

You see, I met the ”Godmother of Virtual Reality” Nonny de la Peña at IEEE VR2013 conference, and we talked about her work. At that point I had already heard about her Guantanamo Bay detainee VR experience, where the user has to endure in a stress position while hearing “interrogation noises” from the next room.

What a way to put yourself in another person’s shoes! And that is the idea of immersive journalism, a concept coined by de la Peña. You could watch the news from a small box in your room, or you could experience the news in first person with the aid of virtual reality.

I liked Nonny’s ideas and asked to see more of her work. She was very hospitable and in March 2013 she gave me and my friend a tour at the USC Institute for Creative Technologies (ICT) in Los Angeles.

Hunger in LAFirst Nonny showed us her production Hunger in LA. It’s an immersive journalism piece where the driving force is real audio recorded at Los Angeles food bank. At the time of the recording there were delays in food distribution, it started to get crowded, one person had a seizure, and ambulance had to be called.

Novice experiencing Hunger in LANonny described that some viewers of Hunger in LA had been so touched by the experience that they cried. This didn’t happen with me, or my friend who was a VR novice. Perhaps we were all too jaded for that. But the use of real, non-acted audio was very moving, and I can see how people could have strong reactions for such authentic content.

Trying out Hunger in LAThere were all sorts of set pieces in the ICT laboratory as seen in the background of the above photo. Apparently they have been working closely with US army, exploring military training applications of virtual reality.

ICT labWe got to see different parts of the laboratory. Above is a lab desk full of prototypes at USC ICT, where Palmer Luckey worked as a lab technician with FOV2GO head-mounted display.

DK1 in March 2013Oculus had given DK1s to ICT before the official shipping date of March 29th 2013.

Mobile VR prototypeThis was one of the mobile head-mounted display prototypes that we tried.

Lightstage at ICTWe also got a chance to see ICT’s Light Stage, which has been used to capture 3D scans of actors for several movies. Many thanks to Nonny de la Peña for giving us the tour and sharing her work!

Posted in Virtual Reality | Tagged , , , , , | Leave a comment

HTC Vive setup experiences

In November I got to borrow a HTC Vive dev kit for a few days. I was responsible for setting it up at a AEC hackathon in Helsinki. Before I share my experiences in detail, here are my two suggestions to Valve:

  • Allow developers to opt out from auto-updating SteamVR software. If I have a working demo configuration, I don’t want an automatic update to break it with a new plugin version etc.
  • Do not require Steam to run in the background of SteamVR. This is just common cleanliness, as it was a bit annoying that every time I started SteamVR it also launched Steam.

Overall the experience, particularly running the demos, was great. I already had tried the Aperture Robot Repair demo in August, but the display quality and tracking accuracy still made me very happy. I got very positive reactions from my colleagues in Aalto University to whom I showed the Vive for the first time.

Aalto University researchers trying out HTC Vive for the first time

Getting the dev kit to work took awhile. After connecting and placing the physical hardware, SteamVR wasn’t able to properly access the hardware no matter what I tried. And there were plenty of things to try, as can be seen in the SteamVR forum. It wasn’t until I updated the firmware for the HMD and the controllers that everything started working. I had to use rather unwieldy command line tools, whereas Oculus Rift DK2 had offered a simple firmware update process through the Oculus Configuration Utility.

When all the systems showed green status in SteamVR, creating and running a test VR scene in Unity Editor was a breeze. As a side note I’m happy to see that Unity is integrating VR functionality directly into their engine, which eases development for different VR platforms. I’d imagine that Epic is doing the same with Unreal Engine.

Occasionally the Vive stopped working after restarting my computer, and I needed to uninstall Vive’s USB drivers and reboot to solve the problem. According to Valve this issue is related to Vive’s HMD control box. From what I understand the vast majority of problems reported in SteamVR forum can be attributed to that. I believe that the situation will be much better with the 2nd Vive dev kit.

I didn’t have any problems with the tracking quality and everything ran smoothly. My only grievance is that I couldn’t install any of the cool Vive demos from Steam. Currently Valve has to separately set those privileges for each Steam account, and we couldn’t get them to do that in the short time-frame that we had. Instead I resorted to googling for unofficial, 3rd party Vive demos, which understandably had lower production values. For some reason I needed to run each demo in administrator mode to get them to work.

To summarize: this first HTC Vive dev kit, its hardware and parts of the software, feels like it was hacked together by a group of scientists in a lab. What actually happened is perhaps very close to that. In contrast Oculus DK1 and DK2 were slightly more polished, because as a pioneer Oculus had more to prove. This is not a complaint, and I’m quite happy that HTC and Valve decided to grant developers such an early access. HTC Vive, particularly its Lighthouse tracking, is just so good that it’s easy to overlook the lack of refinement in this early dev kit. I hope that soon I will get a permanent access to HTC Vive, so I can integrate it into my RUIS toolkit, enabling developers to combine room-scale Lighthouse tracking with full-body tracking of Kinect.

Posted in Virtual Reality | Tagged , , , , , , , , | Leave a comment

RUIS receives praising review

An article by researchers from The University of Louisiana at Lafayette reviews RUIS among with two other virtual reality toolkits for Unity. RUIS did very well in the review, and the original version of the article that I read in August stated that

with RUIS being free and highly versatile, it is the clear winner for low budget applications.

The author changed the wording in the final article version to “promising for low budget applications“, because their adviser suggested using a wording that sounds less biased. Oh well 🙂

In the article RUIS reached almost the same score as MiddleVR (a professional $3000 toolkit) which came on top when price was not considered, as seen from the below table adapted from the article:

getReal3D MiddleVR RUIS
Performance & reliability 2 5 4
CAVE display flexibility 2 4 3
Interaction flexibility 2 4 5
Ease of use 4 3 3
VR applications 2 5 4
total  12 21 19

In the above table each category was given 1-5 points.

In terms of “Documentation and support” getReal3D scored 10, MiddleVR 20, and RUIS 14. Improving RUIS documentation and providing tutorials is in our todo list.

The article is slightly mistaken in that it says that top and bottom CAVE displays are not supported by RUIS, but this is not the case. The display wall center position, normal, and up vectors just need to be configured in RUISDisplay component. Please note that RUIS is mostly intended for CAVEs with a small number of displays because each view is rendered sequentially. For faster CAVE rendering in Unity you should probably try MiddleVR or getReal3D, which offer clustered rendering.

The article was published in International Journal for Innovation Education and Research (IJIR).

P.S. I participated in Burning Man 2015, where I demoed our Vertigo application at VR Camp. They had a dozen of computers with Oculus Rift DK2 and a HTC Vive. Here is a photo of me trying out Tilt Brush on HTC Vive.

2850TiltBrush

Posted in RUIS | Tagged , , , , , , | Leave a comment